**Table of Contents**
1. Introduction
2. Setting up Acuity to Freshbooks
1. Logging into your QET account
2. Integrating with Freshbooks
3. Functions of Acuity with Freshbooks
4. Creating and sending invoices
5. Mapping client information
3. Making changes to the integration
4. Creating a meeting in Acuity
5. Viewing the invoice in Freshbooks
6. Adding payment options
7. Sending the invoice
8. Conclusion
**Setting up Acuity to Freshbooks**
In today's demo, we will explore how to set up Acuity to Freshbooks, enabling you to schedule meetings in Acuity and send invoices to clients via Freshbooks. This integration not only helps you track your income but also allows you to accept payments seamlessly.
**Logging into your QET account**
To begin, log into your QET account and navigate to the bottom left-hand side of the screen. Look for the "Integrations" option and click on it. This will display the various types of integrations that can work with Acuity.
**Integrating with Freshbooks**
Within the integrations menu, locate "Freshbooks Cloud Accounting" and click on "Setup." Follow the prompts to connect Acuity with Freshbooks. Once connected, you will gain access to several functions that Acuity can perform with Freshbooks.
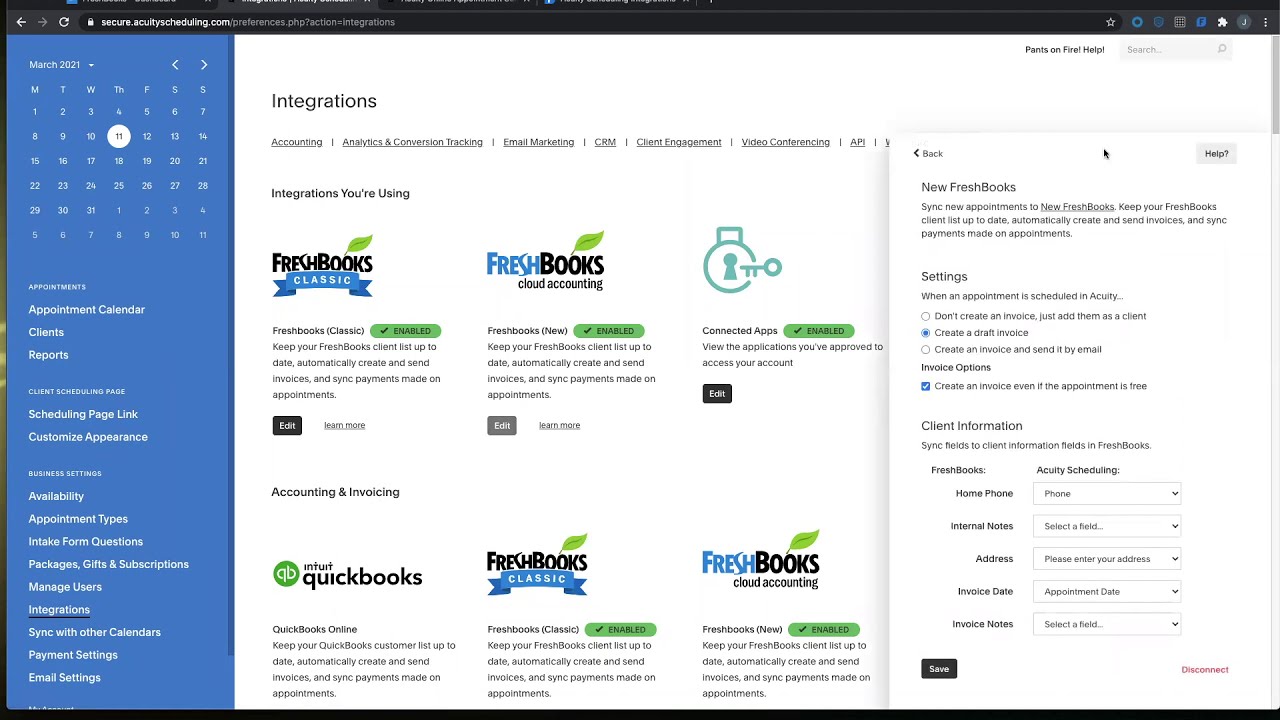
**Functions of Acuity with Freshbooks**
Under the settings section, you can create invoices, add clients, and send invoices via email. It's important to note that when an invoice is sent to Freshbooks, it is automatically set as "cash." If you require clients to pay by credit card, you should create a draft invoice to enable the payment option.
**Creating and sending invoices**
To create an invoice, click on the "Create Invoice" option and add the person as a client. Alternatively, you can create a draft invoice or send an invoice directly by email. The choice depends on your specific requirements.
**Mapping client information**
When creating an invoice, you will need to map client information from Acuity to Freshbooks. This ensures that the options selected in Acuity match with your Freshbooks settings. Take your time to choose the appropriate options for a seamless integration.
**Making changes to the integration**
If you ever need to make changes to the integration settings, simply click on "Integrations," find the connection, click "Edit," and modify the settings as needed. This flexibility allows you to adapt the integration to your evolving needs.
**Creating a meeting in Acuity**
Once the account is connected, you can proceed to create a meeting within Acuity. Utilize the scheduling features of Acuity to set up appointments and manage your calendar efficiently.
**Viewing the invoice in Freshbooks**
To view the invoice in Freshbooks, navigate to the "Invoices" section. Here, you will find the invoice that has been pulled in based on the settings you selected during the Acuity setup. Take a moment to review the invoice and ensure its accuracy.
**Adding payment options**
If you want to provide clients with the option to make online payments, you can do so within Freshbooks. Click on the invoice, select "Edit," and enable the "Accept Online Payments" feature. This will allow your clients to conveniently pay through the provided payment options.
**Sending the invoice**
Once you have reviewed and finalized the invoice, you can send it to the client. Click on "Send To" and enter the recipient's details. With a few simple clicks, the invoice will be on its way.
**Conclusion**
In conclusion, setting up Acuity to Freshbooks offers a seamless integration that streamlines your scheduling and invoicing processes. By following the steps outlined in this guide, you can efficiently manage your appointments, track your income, and accept payments with ease.
**Highlights**
- Set up Acuity to Freshbooks for efficient scheduling and invoicing
- Connect your QET account with Freshbooks to access various functions
- Create invoices, add clients, and send invoices via email
- Map client information to ensure a smooth integration
- Make changes to the integration settings as needed
- Utilize Acuity's scheduling features to create meetings
- View and manage invoices in Freshbooks
- Enable online payment options for clients
- Send invoices with a few simple clicks
- Streamline your scheduling and invoicing processes with Acuity and Freshbooks
**FAQ**
Q: Can I connect Acuity with other accounting software?
A: Acuity offers integrations with various accounting software, including Freshbooks. However, the availability of integrations may vary. Check Acuity's documentation for a complete list of supported integrations.
Q: Can I customize the appearance of the invoices?
A: Yes, both Acuity and Freshbooks provide customization options for invoices. You can add your logo, choose colors, and personalize the layout to match your brand.
Q: Can I track payments within Acuity?
A: Acuity primarily focuses on scheduling and invoicing. While it offers integration with Freshbooks for payment tracking, Acuity itself does not provide extensive payment tracking features.
Q: Is there a mobile app for Acuity and Freshbooks?
A: Yes, both Acuity and Freshbooks offer mobile apps for iOS and Android devices. You can manage your appointments, invoices, and payments on the go.
Q: How secure is the integration between Acuity and Freshbooks?
A: Acuity and Freshbooks prioritize data security and employ industry-standard encryption protocols. However, it's always recommended to follow best practices for data protection and ensure the security of your login credentials.
Resources:
- [Acuity](https://www.acuityscheduling.com/)
- [Freshbooks](https://www.freshbooks.com/)
- [AI Chatbot](https://www.voc.ai/product/ai-chatbot) (Introducing an AI chatbot that reduces customer service workload)

